My feelings about github are somewhere at the nexus of aggravated and grateful. Git is not easy because it is composed of a series of incantations based out of somewhat identifiable English. Close enough that you think they have meaning but far enough that you want to bludgeon yourself in the hopes of forgetting semantics. And yet, version control and backups are important to save your butt.
I shall confess (without apology), that I do not use command line git(hub). Can I? Sure. Do I want to try and remember those commands while I’m trying to keep my brain on my code? No. So the github app is where I find the sweet spot between extracting the power of version control without the anguish.
Here’s my use case for git: I write code, I want to track it, github works well for that, and I usually work alone. All I need to do is create, commit, sync, and get back to my freaking job. I don’t do pull requests or contribute to shared projects. GET OFF MY LAWN.
Sorry, let’s get back to how to do commits and restore deleted files.
Step 1: Make a github account. Already have one? Go apply for the student developer pack if you haven’t already.
Step 2: Download the Github Desktop application: https://desktop.github.com/
Step 3: Go into the application, find preferences. Remember password. Sign in.
Step 4: Find the plus button thing. Click. Add will let you point the app at an existing folder and create a repo from that, Create makes a new one, and Clone is an incantation for the sociable. Click Create, give it a name, and click Create repository.

Step 5: That repository name is now a folder. Go find it. Or make a new one somewhere you can remember.
Step 6: Add some crap to that folder.

Step 7: Go back to the app and pour your eyeballs on your newly tracked file. The stuff on the right shows you the contents of the file. Green shows additions, red deletions. The little icon next to the repository name on the sidebar should be a computer monitor looking doodad, meaning that it is a local repo.
Step 8: Add a commit message (short & sweet) and description (maybe longer, with punctuation). Click Commit to Master. To send off to github, click Publish on the upper right. You can stack up a bunch of commits before publishing, if you want. The first time through it’ll ask you some stuff. Just click the publish again.

Step 10: Go change some crap in your file and check back to the app. Make a less crappy commit message and click Commit to master. Then this time Sync when ready to send it to github.

Step 11: Delete that file and check the app. GONE.

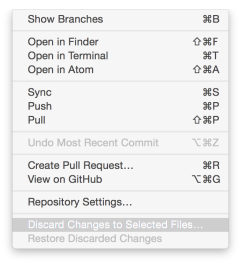
Click the Repository menu item and select Discard Changes to Selected Files.

Ya, everything goes away from the repo because THE FILE IS BACK.
Step 12: Go back to your research.
490 words.